Introduction and use cases
Today I would like to show how you can set up authentication with OAuth 2.0 for applications that are running in Azure Kubernetes Service with help of NGINX Ingress Controller and OAuth2 Proxy.
There may be multiple reasons for why you would want to implement authentication with OAuth 2.0 this way. For example, you may not want to implement authentication logic in the application itself or, like it was in my case, you want to limit access to a third-party application that you’re running in your cluster in case authentication is not natively supported by the application itself (or requires an Enterprise license for the same😃). I was recently working on implementing an open source version of kubecost for cost management in our AKS clusters and the thing is that the open source version of kubecost doesn’t natively support authentication. You can enable support for SSO with SAML 2.0 by acquiring an Enterprise version of kubecost which was not applicable in my scenario. Nevertheless, I still wanted to expose kubecost instances so that other teams and business stakeholders can easily access those and check whatever data they need. At the same time I still wanted to limit access and protect the application so I had to look for an alternative solution. And that’s where NGINX Ingress Controller and OAuth2 Proxy come into play!😺
With just a few configuration changes in NGINX Ingress Controller and a lightweight proxy application it’s possible to easily configure OAuth 2.0 authentication with Microsoft Entra ID as an identity provider. So let’s take a look at how we can do that!🌟
Setting up authentication with OAuth 2.0
I will be using kubecost as an example application in this walkthrough. It’s now deployed in an AKS cluster and is exposed without any authentication (yet!) on this example URL: https://kubecost-kris.unicorndomain.com. Now, let’s protect it by setting up an OAuth2 Proxy.
In order to do that we will need to perform following steps:
🐾 Create an application in Microsoft Entra ID which will represent OAuth2 Proxy application that we’re going to implement later;
🐾 Update NGINX Ingress configuration for kubecost to enable support for external authentication;
🐾 Configure and deploy OAuth2 Proxy application which will act as a reverse proxy and provide authentication to kubecost with Microsoft Entra ID;
In addition you will need to have a TLS certificate provisioned both for your application and the OAuth2 Proxy. In my example use case, I’m using cert-manager which is the most popular certificate management application for Kubernetes. Setting up cert-manager is outside of scope for this blog post but it’s expected that you have a certificate management application available in order to be able to provision respective TLS certificates. If you want to learn more about cert-manager, you can check this link: cert-manager
Let’s get to it! 🚀
Create OAuth2 Proxy application in Microsoft Entra ID
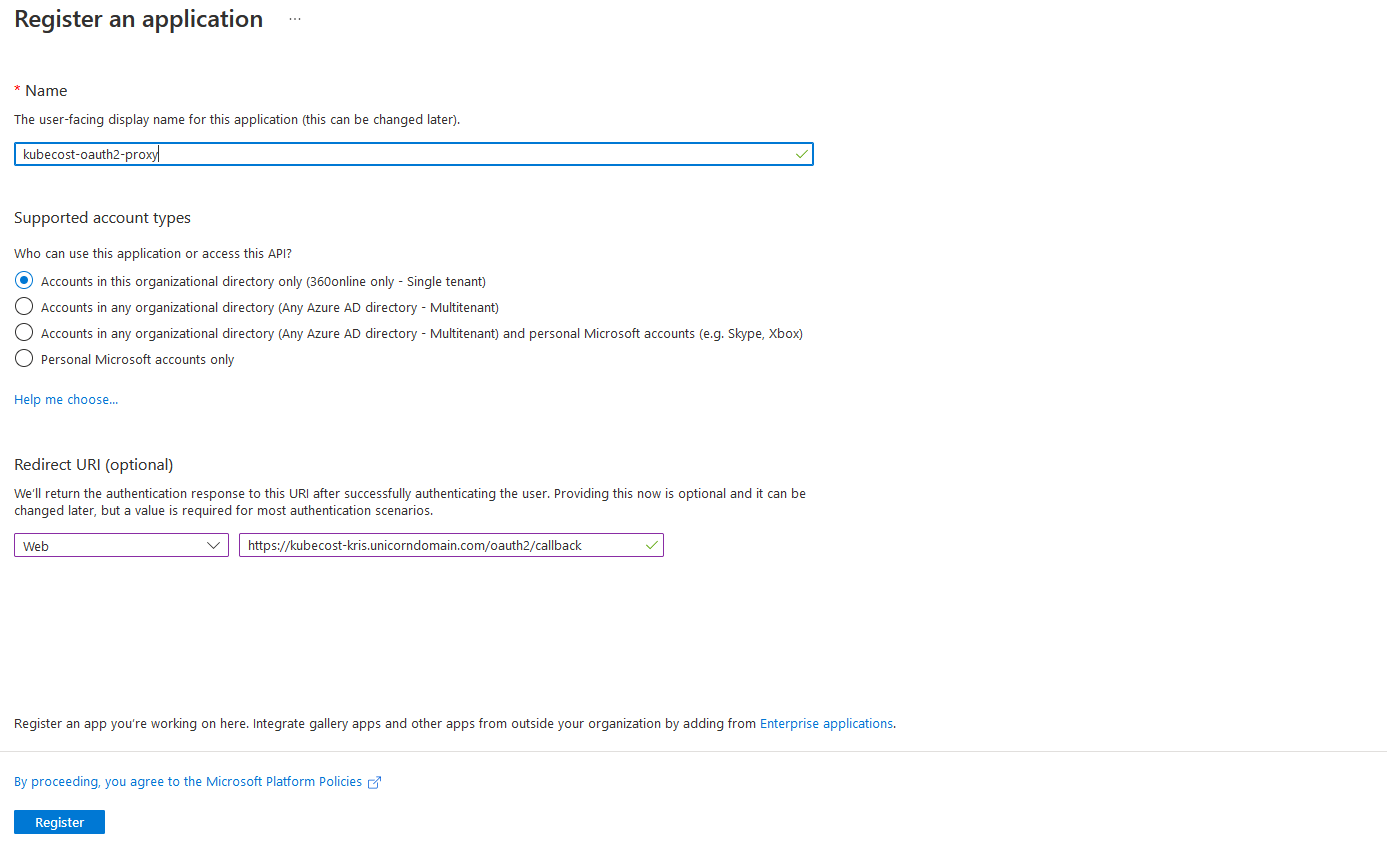
In order to create an OAuth2 Proxy application we need to go to App registrations section in Microsoft Entra ID and choose New registration. Then provide following properties:
🐾 Name of the Microsoft Entra ID application. Since I’m setting it up for kubecost, I’ll call it kubecost-oauth2-proxy.
🐾 Microsoft Entra ID single-tenant or multi-tenant account types. In my case there’s only one directory being used, therefore I will choose Accounts in this organizational directory only.
🐾 Redirect URI which will represent an application URL that will be receiving an authorization code on behalf of the application. Since we’re using an OAuth2 Proxy, a redirect URI in our case is a public URL of your application plus oauth2/callback, i.e. https://kubecost-kris.unicorndomain.com/oauth2/callback
Once all properties are provided, click Register - the application will then be created for you in Microsoft Entra ID.
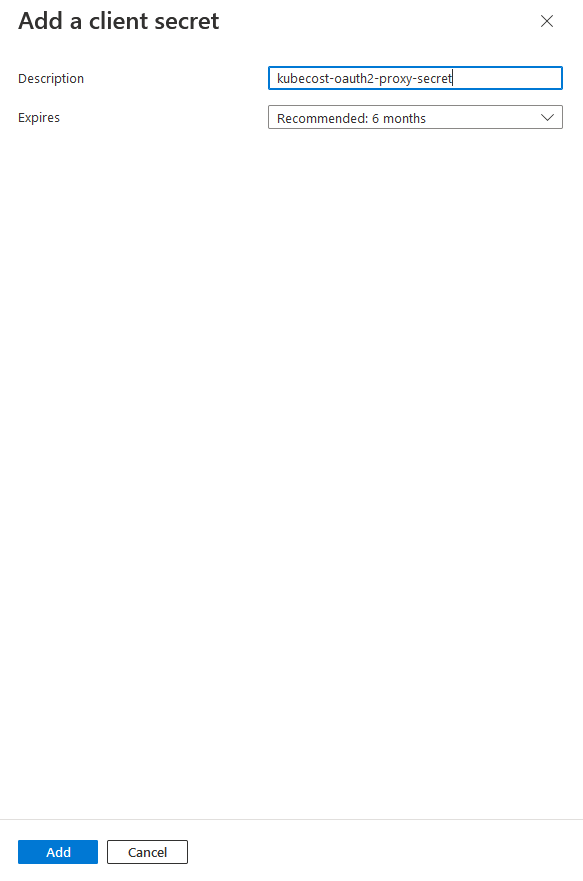
Next, we’ll need to create a client secret which will allow OAuth2 Proxy to perform authentication on behalf of our application. In Microsoft Entra ID, navigate to recently created application. In Certificates & secrets section choose New client secret. Then provide following properties:
🐾 Description that explains what the secret will be used for. In my case it’s kubecost-oauth2-proxy-secret.
🐾 Expiration lifecycle of the secret. For better security, choose at least the recommended lifecycle which at the moment of writing this blog post is 6 months. If you can automate secret renewal, do choose as short lifecycle as possible.
Once all properties are provided, click Add. Once the client secret is created, do ensure to copy it and save for a later step since the secret will be shown to you only once, right upon creation.
Finally, go to the Overview section of the recently created application in Microsoft Entra ID and make a note of Application (client) ID and Directory (tenant) ID which we’ll need later.
Now we’re done with setting everything up in Microsoft Entra ID - let’s prepare our application’s Ingress next!😺
Configure NGINX Ingress Controller
In order to be able to expose our application publicly, we need to create an Ingress. Since my kubecost application is already exposed, I have an Ingress resource already which looks something like this:
apiVersion: networking.k8s.io/v1
kind: Ingress
metadata:
  name: kubecost-cost-analyzer
  namespace: kubecost
  annotations:
    nginx.ingress.kubernetes.io/affinity: "cookie"
    nginx.ingress.kubernetes.io/session-cookie-name: "route"
    nginx.ingress.kubernetes.io/session-cookie-hash: "sha1"
    nginx.ingress.kubernetes.io/session-cookie-expires: "172800"
    nginx.ingress.kubernetes.io/session-cookie-max-age: "172800"
    nginx.ingress.kubernetes.io/rewrite-target: /
    nginx.ingress.kubernetes.io/proxy-body-size: "2000m"
    nginx.ingress.kubernetes.io/proxy-buffer-size: "32k"
    nginx.ingress.kubernetes.io/ssl-redirect: "true"
    meta.helm.sh/release-name: kubecost
    meta.helm.sh/release-namespace: kubecost
  labels:
    app: cost-analyzer
    app.kubernetes.io/instance: kubecost
    app.kubernetes.io/managed-by: Helm
    app.kubernetes.io/name: cost-analyzer
spec:
  ingressClassName: nginx
  tls:
  - hosts:
    - kubecost-kris.unicorndomain.com
    secretName: kubecost-cost-analyzer-tls-cert
  rules:
  - host: kubecost-kris.unicorndomain.com
    http:
      paths:
      - path: /
        pathType: Prefix
        backend:
          service:
            name: kubecost-cost-analyzer
            port:
              number: 9090
Since I’ve deployed kubecost with Helm and current Ingress belongs to the same release, I’ve added additional annotations which will let Helm include and manage this Ingress resource as part of the kubecost release. You can read more about adding Kubernetes resources to existing Helm releases here: How to Include New Kubernetes Resource Into Existing Helm Release
Now, the only thing we will need to do to configure support for OAuth 2.0 authentication is to add following annotations to the Ingress object:
🐾 auth-url: Annotation that represents URL to the authentication service where requests must be sent.
nginx.ingress.kubernetes.io/auth-url: "https://[application-hostname]/oauth2/auth"
🐾 auth-signin: Annotation that represents URL to the location of the error page:
nginx.ingress.kubernetes.io/auth-signin: "https://[application-hostname]/oauth2/start?rd=https://[application-hostname]/oauth2/callback"
Please note that if you’re using AKS Application Gateway Ingress Controller instead of NGINX Ingress Controller, these annotations are NOT yet supported. Introducing support for it is on the roadmap but ETA is not clear at this point (January 2023). You can follow this GitHub Issue for further updates: Auth Proxy Support
So, in my example the final kubecost application Ingress definition will look like this:
apiVersion: networking.k8s.io/v1
kind: Ingress
metadata:
  name: kubecost-cost-analyzer
  namespace: kubecost
  annotations:
    # OMITTED - ALL ANNOTATIONS AS ABOVE
    nginx.ingress.kubernetes.io/auth-url: "https://kubecost-kris.unicorndomain.com/oauth2/auth"
    nginx.ingress.kubernetes.io/auth-signin: "https://kubecost-kris.unicorndomain.com/oauth2/start?rd=https://kubecost-kris.unicorndomain.com/oauth2/callback"

  labels:
    # OMITTED - SAME AS ABOVE
spec:
  # OMITTED - SAME AS ABOVE
Configuration of NGINX Ingress is done - finally we’re ready to deploy OAuth2 Proxy!🤩
Configure and deploy OAuth2 Proxy
Last thing we’ll need to do is to install a proxy application which will authenticate the requests coming into our main application, which in my example case is kubecost. There are many good open source alternatives for such a proxy out there but I can recommend the one called OAuth2 Proxy - it’s well maintained and has a big community support. It’s also recommended by NGINX. You can find more information in OAuth2 Proxy GitHub and documentation by checking out the links in Additional resources section below.😉
OAuth2 Proxy doesn’t have a Helm chart so we’ll create a Kubernetes YAML template and include it as part of the kubecost Helm release by adding a few annotations to the OAuth2 Proxy Ingress definition.
But before we do that, we need to make a few preparations first. OAuth2 Proxy requires some information from us in order to work properly:
🐾 Tenant ID, Client ID and Client Secret of an Microsoft Entra ID application that we’ve created earlier;
🐾 Cookie secret for session information storage;
Since we’ve made a note of tenant id, client id and client secret what we need to do now is to generate a cookie secret. Cookie storage is the default storage type used by OAuth2 Proxy to store information about a session in a client-side cookie, therefore setting a cookie secret is mandatory. You can also use Redis as an alternative session storage but it’s outside of scope of this blog post. You can read more about OAuth2 Proxy session storage options here: Session Storage
Cookie Secret
It’s an important and good practice to always generate a strong secret, using cryptographically secure random number generator and never re-use the same secret across applications! Since cookie secret can be used for sensitive information like storing user session data, in the wrong hands this information can cause a lot of damage and even let attacker get control of the server hosting an application. There are several ways to generate a cookie secret, for example with OpenSSL: openssl rand -hex 32. Once you’ve generated a secret value, make a note of it, we’re going to use it in a second.
Create OAuth2 Proxy secrets in AKS cluster
The last thing we need to do before we can deploy OAuth2 Proxy is to save Client ID, Client Secret and Cookie Secret as Kubernetes Secrets. Of course we could’ve just written them in plaintext in the Deployment YAML but we’re conscious about security, right?😼 We want to keep secrets secret, therefore we’ll deploy sensitive values as Kubernetes Secrets.
As an alternative to Kubernetes Secrets in AKS you can save secrets with help of The Azure Key Vault Provider for Secrets Store CSI Driver. Walkthrough of how to do that will be provided in the subsequent blog posts. In current blog post we’ll be utilizing Kubernetes Secrets. If you would like to learn more about The Azure Key Vault Provider for Secrets Store CSI Driver, you can check official Microsoft documentation: Use the Azure Key Vault Provider for Secrets Store CSI Driver in an AKS cluster
In AKS cluster where OAuth2 Proxy will be installed, in the namespace where your application is running (in my case it’s kubecost), run following commands with kubectl in order to create secrets for the respective values:
kubectl create secret generic client-id --from-literal=oauth2_proxy_client_id=[client-id-value] -n [application-namespace]

kubectl create secret generic client-secret --from-literal=oauth2_proxy_client_secret=[client-secret-value]
-n [application-namespace]

kubectl create secret generic cookie-secret --from-literal=oauth2_proxy_cookie_secret=[cookie-secret-value]
-n [application-namespace]
You can also create Kubernetes Secrets from file by using --from-file instead of --from-literal where you provide the values directly in the command line - you can find more about it here: Managing Secrets using kubectl
Finally we’re ready to deploy OAuth2 Proxy!🥳 Below you can find an example of a Deployment YAML that will deploy OAuth2 Proxy as part of the existing Helm release for kubecost application.
Wherever you can see
kubecostmentioned in the example template below, you can replace it with the name of your specific application.
A few things to be aware of:
-
I wouldn’t recommend to use the latest container image of any third-party application since it may introduce breaking changes and cause inconsistent application behaviour. Always choose a stable release version and have a good upgrade routine in place to ensure that you’re keeping third-party applications up-to-date.
-
In the
template.spec.containers.envsection of the Deployment, we’re integrating Kubernetes Secrets for the sensitive values which we created earlier as the environment variables for OAuth2 Proxy. Names of the environment variables should stay as provided in the example since that’s what OAuth2 Proxy expects: OAuth2 Proxy - Environment variables
#oauth2-proxy.yaml

apiVersion: apps/v1
kind: Deployment
metadata:
  annotations:
    meta.helm.sh/release-name: kubecost # can be removed if your application isn't deployed through Helm
    meta.helm.sh/release-namespace: kubecost # can be removed if your application isn't deployed through Helm
  labels:
    application: kubecost-oauth2-proxy
    app.kubernetes.io/managed-by: Helm # can be removed if your application isn't deployed through Helm
  name: kubecost-oauth2-proxy-deployment
  namespace: kubecost
spec:
  replicas: 1
  selector:
    matchLabels:
      application: kubecost-oauth2-proxy
  template:
    metadata:
      labels:
        application: kubecost-oauth2-proxy
    spec:
      containers:
      - args:
        - --provider=oidc
        - --azure-tenant=[oauth2-proxy-azure-ad-tenant-id] # Microsoft Entra ID OAuth2 Proxy application Tenant ID
        - --pass-access-token=true
        - --cookie-name=_proxycookie # this can be any name of your choice which you would like OAuth2 Proxy to use for the session cookie
        - --email-domain=*
        - --upstream=file:///dev/null
        - --http-address=0.0.0.0:4180
        - --oidc-issuer-url=https://login.microsoftonline.com/[oauth2-proxy-azure-ad-tenant-id]/v2.0
        name: kubecost-oauth2-proxy
        image: quay.io/oauth2-proxy/oauth2-proxy:v7.3.0
        imagePullPolicy: Always
        env:
        - name: OAUTH2_PROXY_CLIENT_ID # keep this name - it's required to be defined like this by OAuth2 Proxy
          valueFrom:
            secretKeyRef:
              name: client-id
              key: oauth2_proxy_client_id
        - name: OAUTH2_PROXY_CLIENT_SECRET # keep this name - it's required to be defined like this by OAuth2 Proxy
          valueFrom:
            secretKeyRef:
              name: client-secret
              key: oauth2_proxy_client_secret
        - name: OAUTH2_PROXY_COOKIE_SECRET # keep this name - it's required to be defined like this by OAuth2 Proxy
          valueFrom:
            secretKeyRef:
              name: cookie-secret
              key: oauth2_proxy_cookie_secret
        ports:
        - containerPort: 4180
          protocol: TCP
        resources:
          limits:
            cpu: 100m
            memory: 128Mi
          requests:
            cpu: 100m
            memory: 128Mi
---
apiVersion: v1
kind: Service
metadata:
  annotations:
    meta.helm.sh/release-name: kubecost # can be removed if your application isn't deployed through Helm
    meta.helm.sh/release-namespace: kubecost # can be removed if your application isn't deployed through Helm
  labels:
    application: kubecost-oauth2-proxy
    app.kubernetes.io/managed-by: Helm # can be removed if your application isn't deployed through Helm
  name: kubecost-oauth2-proxy-svc
  namespace: kubecost
spec:
  ports:
  - name: http
    port: 4180
    protocol: TCP
    targetPort: 4180
  selector:
    application: kubecost-oauth2-proxy
---
apiVersion: networking.k8s.io/v1
kind: Ingress
metadata:
  annotations:
    nginx.ingress.kubernetes.io/ssl-redirect: "true"
    cert-manager.io/cluster-issuer: [cert-manager-cluster-issuer-name]
    nginx.ingress.kubernetes.io/proxy-body-size: "2000m"
    nginx.ingress.kubernetes.io/proxy-buffer-size: "32k"
    meta.helm.sh/release-name: kubecost # can be removed if your application isn't deployed through Helm
    meta.helm.sh/release-namespace: kubecost # can be removed if your application isn't deployed through Helm
  labels:
    app.kubernetes.io/managed-by: Helm # can be removed if your application isn't deployed through Helm
  name: kubecost-oauth2-proxy-ingress
  namespace: kubecost
spec:
  ingressClassName: nginx
  tls:
    - hosts:
        - [application-hostname]
      secretName: kubecost-oauth2-proxy-ingress-tls-secret
  rules:
    - host: [application-hostname]
      http:
        paths:
          - path: /oauth2
            pathType: Prefix
            backend:
              service:
                name: kubecost-oauth2-proxy-svc
                port:
                  number: 4180
Once you’ve verified that configuration and the template look correct you can deploy OAuth2 Proxy in AKS cluster where your application is running with following kubectl command: kubectl apply -f ./my-path-to-template/oauth2-proxy.yaml
And it’s done! Now, when you access the application, you will first be redirected to the Microsoft authentication.
Deployment with Helm
There are multiple Helm charts available that can make it significantly easier to deploy OAuth2 Proxy. There’s an official Helm chart available: auth2-proxy/manifests and there’s also a Bitnami Helm chart available which provides support for direct deployment to AKS with Bitnami Charts at Microsoft Azure Marketplace: OAuth2 Proxy packaged by Bitnami.
In this example I will be using the official Helm chart, but the approach is the same for both charts. There may be minor differences in supported parameters, but most of them are identical. It’s always a good practice to verify your configuration towards official documentation before deployment.
What is great with OAuth2 Proxy Helm chart is that you don’t need to explicitly create Kubernetes Secrets or even a Redis deployment - by providing just a few additional parameters as part of the Helm chart deployment most of the configuration and set up will be done automatically for you, compared to deployment with Kubernetes YAML templates.
So, if we were to deploy OAuth2 Proxy with the same configuration as we used in the section above where we deployed it with Kubernetes YAML templates, we will first need to create a values.yaml file which will include deployment configuration parameters.
Here we will also provide proxyVarsAsSecrets: true parameter which will automatically create OAUTH2_PROXY_CLIENT_ID OAUTH2_PROXY_CLIENT_SECRET and OAUTH2_PROXY_COOKIE_SECRET variables as Kubernetes Secrets and refer them in respective environment variables accordingly, which means that we can fully skip the step we did in the section above, where we manually created Kubernetes Secrets for these values! In this case all the values will be created as part of a single Secret object of type Opaque, by default using template fullname as name, for example oauth2-proxy.

ingress:
  enabled: true
  className: nginx
  path: /oauth2
  pathType: Prefix
  hosts:
    - [application-hostname]

  annotations:
    nginx.ingress.kubernetes.io/ssl-redirect: "true"
    cert-manager.io/cluster-issuer: [cert-manager-cluster-issuer-name]
    nginx.ingress.kubernetes.io/proxy-body-size: "2000m"
    nginx.ingress.kubernetes.io/proxy-buffer-size: "32k"
  tls:
    - secretName: kubecost-oauth2-proxy-ingress-tls-secret
      hosts:
        - [application-hostname]

proxyVarsAsSecrets: true

config:
  cookieName: _proxycookie
  clientID: [INJECTED_OAUTH2_PROXY_CLIENT_ID] # can be replaced dynamically as part of CI/CD
  clientSecret: [INJECTED_OAUTH2_PROXY_CLIENT_SECRET] # can be replaced dynamically as part of CI/CD
  cookieSecret: [INJECTED_OAUTH2_PROXY_COOKIE_SECRET ] # can be replaced dynamically as part of CI/CD
resources:
   limits:
     cpu: 100m
     memory: 128Mi
   requests:
     cpu: 100m
     memory: 128Mi

extraArgs:
  provider: oidc
  azure-tenant: [oauth2-proxy-azure-ad-tenant-id]  # Microsoft Entra ID OAuth2 Proxy application Tenant ID
  pass-access-token: true
  email-domain: "*"
  upstream: file:///dev/null
  http-address: 0.0.0.0:4180
  oidc-issuer-url: https://login.microsoftonline.com/[oauth2-proxy-azure-ad-tenant-id]/v2.0
  session-store-type: redis # <- Redis setting, can be removed if default cookie storage is used
  redis-use-cluster: true # <- Redis setting, can be removed if default cookie storage is used
  redis-cluster-connection-urls: redis://[REDIS_URL_OR_IP]:[REDIS_PORT] # Redis setting, can be removed if default cookie storage is used

podLabels:
  application: kubecost-oauth2-proxy
customLabels:
  application: kubecost-oauth2-proxy

replicaCount: 1
That’s it!😺 Now you can deploy OAuth2 Proxy with Helm:
helm repo add oauth2-proxy https://oauth2-proxy.github.io/manifests
 helm repo update
 helm upgrade --install oauth2-proxy -n oauth2-proxy --create-namespace -f values.yaml oauth2-proxy/oauth2-proxy
There are many useful parameters available that you can configure to your benefit like, for example, use existing Kubernetes Secrets for OAuth2 Proxy or choosing between defining OAuth2 Proxy variables as secrets or environment variables, etc. You can check all the available parameters for the official Helm chart here: oauth2-proxy/oauth2-proxy: Configuration and for the Bitnami chart here: bitnami/oauth2-proxy: Parameters.
Can a single OAuth2 Proxy instance be used for multiple applications using different subdomains?
Yes, you can!😼
There may be use cases where you have multiple applications running in a Kubernetes cluster which are exposed on different subdomains. It may be cumbersome to create and maintain a dedicated instance of OAuth2 Proxy for every application. Fortunately it is possible to use a single instance of OAuth2 Proxy and still provide support for authentication to your applications.
A requirement for this is to use Redis for storing cookies. In this scenario multiple cookies will be used which will exceed the max cookie size set by default OAuth2 Proxy Cookie Storage. You can read more about setting up Redis storage for OAuth2 Proxy here: Redis Storage
You can configure Oauth2 Proxy to use both a single-node Redis instance and a Redis cluster. For example, Redis can easily be deployed in Kubernetes with Helm charts from Bitnami:
- Single-node Redis: bitnami/redis
- Redis cluster: bitnami/redis-cluster
You can find all the supported arguments for Redis storage in OAuth2 Proxy here: OAuth2 Proxy - Command Line Options.
The rest of the configuration you will need:
- Set Microsoft Entra ID OAuth2 Proxy application to support multi-tenant account types (if required, depends on your use case);
- In OAuth2 Proxy Ingress Object definition, add multiple hosts representing your applications;
Please note that in this case, where multiple applications use the same OAuth2 Proxy instance, you have multiple upstreams and routing with path-based mapping will be the default behaviour of OAuth2 Proxy. One way you can make it work, as it’s described in this blog post, is by configuring OAuth2 Proxy with NGINX
auth_requestdirective.auth_requestdirective can be configured by providingauth-urlandauth-signinannotations in NGINX Ingress definition, just as described in the section above - these annotations will allow you to provide the redirect URL that can be used after successful sign-in, per applications.
In this scenario you should consider deploying OAuth2 Proxy in a dedicated namespace, separately from other application deployments, for cleaner structure. Please DO NOT use default or kube-system namespaces for this purpose since it’s not considered to be a good practice.
This approach works both with OIDC and Azure providers, with OAuth2 Proxy v7.3.0 (OIDC only due to the bug with Azure provider mentioned in the section below) and v7.4.0 (both Azure and OIDC).
So, let’s take a look at an example.
I have two apps exposed on different subdomains:
aks-helloworld-one.dev.mydomain.comaks-helloworld-two.business.mydomain.com
In my Kubernetes cluster, first app is deployed to aks-helloworld-one namespace, second app is deployed to aks-helloworld-two namespace. OAuth2 Proxy is deployed to oauth2-proxy namespace. I also have a Redis cluster running in redis namespace.
First, we need to add proper OAuth2 Proxy annotations to every application’s Ingress Object definition. The approach here is the same as mentioned earlier - if you’re using NGINX as an Ingress Controller you will need to add following annotations to respective application’s Ingress definition:
# aks-helloworld-one-ingress.yaml
apiVersion: networking.k8s.io/v1
kind: Ingress
metadata:
  name: aks-helloworld-one-ingress
  namespace: aks-helloworld-one
  annotations:
    nginx.ingress.kubernetes.io/auth-url: "https://aks-helloworld-one.dev.mydomain.com/oauth2/auth"
    nginx.ingress.kubernetes.io/auth-signin: "https://aks-helloworld-one.dev.mydomain.com/oauth2/auth/oauth2/start?rd=https://aks-helloworld-one.dev.mydomain.com/oauth2/callback"

  # REST OF THE CODE IS OMITTED
# aks-helloworld-two-ingress.yaml
apiVersion: networking.k8s.io/v1
kind: Ingress
metadata:
  name: aks-helloworld-two-ingress
  namespace: aks-helloworld-two
  annotations:
    nginx.ingress.kubernetes.io/auth-url: "https://aks-helloworld-two.business.mydomain.com/oauth2/auth"
    nginx.ingress.kubernetes.io/auth-signin: "https://aks-helloworld-two.business.mydomain.com/oauth2/auth/oauth2/start?rd=https://aks-helloworld-two.business.mydomain.com/oauth2/callback"

  # REST OF THE CODE IS OMITTED
In the application Deployments themselves no changes should be needed.
Next, in the Oauth2 Proxy Deployment you need to configure Redis for cookie storage, in addition to other relevant configuration, depending on your use case. If we use the example that we used in the section above as reference, configuration section of the OAuth2 Proxy Deployment will look something like this:
#oauth2-proxy.yaml

apiVersion: apps/v1
kind: Deployment
metadata:
  annotations:
    # REST OF THE CODE IS OMITTED
  labels:
    application: oauth2-proxy
  name: oauth2-proxy-deployment
  namespace: oauth2-proxy
spec:
  replicas: 1
  selector:
    matchLabels:
      application: oauth2-proxy
  template:
    metadata:
      labels:
        application: oauth2-proxy
    spec:
      containers:
      - args:
        - --provider=oidc
        - --azure-tenant=[oauth2-proxy-azure-ad-tenant-id]
        - --pass-access-token=true
        - --cookie-name=_proxycookie
        - --email-domain=*
        - --upstream=file:///dev/null
        - --http-address=0.0.0.0:4180
        - --oidc-issuer-url=https://login.microsoftonline.com/[oauth2-proxy-azure-ad-tenant-id]/v2.0
        - --session-store-type=redis # <- REDIS SETTING
        - --redis-use-cluster=true # <- REDIS SETTING
        - --redis-cluster-connection-urls=redis://[REDIS_URL_OR_IP]:[REDIS_PORT] # <- REDIS SETTING - default Redis port is 6379
        name: oauth2-proxy
        image: quay.io/oauth2-proxy/oauth2-proxy:v7.3.0

 # REST OF THE CODE IS OMITTED
Finally, you need to add respective application hosts to OAuth2 Proxy Ingress. If we use the same example that we used in the section above as reference, updated OAuth2 Proxy Ingress will look something like this:
# oauth2-proxy-ingress.yaml

apiVersion: networking.k8s.io/v1
kind: Ingress
metadata:
  annotations:
     # REST OF THE CODE IS OMITTED
  labels:
     # REST OF THE CODE IS OMITTED
  name: oauth2-proxy-ingress
  namespace: oauth2-proxy
spec:
  ingressClassName: nginx
  rules:
  - host: aks-helloworld-one.dev.mydomain.com
    http:
      paths:
      - backend:
          service:
            name: oauth2-proxy-svc
            port:
              number: 4180
        path: /oauth2
        pathType: Prefix
  - host: aks-helloworld-two.business.mydomain.com
    http:
      paths:
      - backend:
          service:
            name: oauth2-proxy-svc
            port:
              number: 4180
        path: /oauth2
        pathType: Prefix
  tls:
  - hosts:
    - aks-helloworld-one.dev.mydomain.com
    - aks-helloworld-two.business.mydomain.com

# REST OF THE CODE IS OMITTED
And we’re done! 🎉 Now, when accessing both https://aks-helloworld-one.dev.mydomain.com and https://aks-helloworld-two.business.mydomain.com authentication through OAuth2 Proxy will be enforced, even though applications are using different subdomains! 😺
Known Issues: OAuth2 Proxy
If you will be using OAuth2 Proxy that I have used in this blog post there are a few known issues you should know about and how those issues can be mitigated.
Version 7.3.0 - Issue with Azure provider
Normally, when you want to use OAuth2 Proxy with Microsoft Entra ID Identity Provider, you would use --provider=azure in the template.spec.containers.args section of the Deployment resource in the template from the previous section. In release 7.3.0 of OAuth2 Proxy a breaking change was introduced which affected Azure provider and a solution for it is to use a generic OIDC provider instead of Azure provider by setting provider to oidc like this: - --provider=oidc. You can also see me using it in the template above. You can check this GitHub Issue for more details on this: v7.3.0 breaks azure provider
This seems to be fixed in version
7.4.0, I’ve tested it and haven’t been able to reproduce this issue in the new version but if you still do experience the same issue with version7.4.0, do check the discussion on the GitHub Issue mentioned above or just switch to OIDC provider.
Version 7.3.0, Azure B2C - Error creating session during OAuth2 callback: neither the id_token nor the profileURL set an email
If you have configured everything correctly and according to what’s described in this blog post but are still getting this error, a workaround will be to add - --user-id-claim=oid to the args section of the OAuth2 Proxy Deployment resource in the template from the previous section. It will override email claim which is required by the OAuth2 Proxy by default with object id. You can read more about it in this Stackoverflow item: How can I debug oauth2_proxy when connecting to Azure B2C?.
Your updated args section will look something like this:
#oauth2-proxy.yaml

# Rest of the configuration is omitted - Other properties are unchanged
spec:
  containers:
  - args:
    - --provider=oidc
    - --user-id-claim=oid # <- This is the new property
    # Rest of the configuration is omitted - Other properties are unchanged
All-in-one deployment package
In my GitHub repo you can find a PowerShell script that includes all the necessary commands and templates in order to create an Microsoft Entra ID application (or use existing app) for OAuth2 Proxy and deploy OAuth2 Proxy to a Kubernetes cluster, either with Kubernetes YAML templates or with official Helm chart: guidemetothemoon:oauth2-proxy
Additional resources
A few resources I’ve found useful on this topic:
- Documentation of OAuth2 Proxy open source project: OAuth2 Proxy Docs
- OAuth2 Proxy GitHub: OAuth2 Proxy
- More on SSO with SAML 2.0 support in kubecost: User Management - SSO/SAML/RBAC
- Support for different authentication types in NGINX Ingress Controller including OAuth: External OAUTH Authentication
That’s it from me this time, thanks for checking in! If this article was helpful, I’d love to hear about it! You can reach out to me on LinkedIn, GitHub or BlueSky 😊
Stay secure, stay safe. Till we connect again!😼